Results
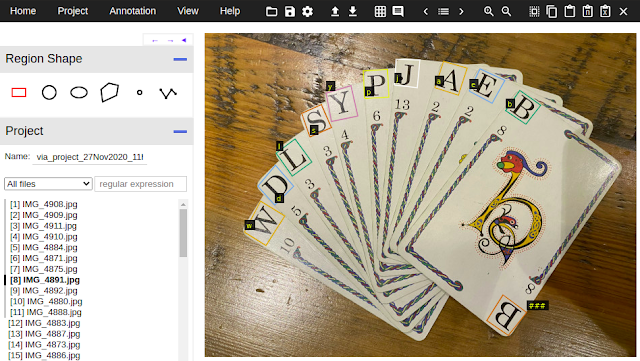
My best run as determined by my test set accuracy ran for 200 epochs in 35 minutes with a small batch size, 6. This run correctly identified every card in the test set. I wanted a practical way to confirm that the model was going to be good enough though so I created a quick script to
predict cards in real-time from a webcam. This allowed me to manipulate the cards in front of the camera and spot any weaknesses:
The Game
On your turn you need to try to make the best scoring word or words from your hand. You can also substitute one of your cards with the card face up on the discard pile. Or choose the next unseen card from the face-down deck. The complication for the algorithm is that you're not trying to make the longest single word but to use up all the cards in your hand on multiple words. Also, some of the cards are double-letter cards, IN for example.
Prefix Trees are used to hold the structure for all possible words and the permutations given the double-letter cards. For example the word: "inquiring" can be constructed from the cards in 8 ways:
'in/qu/i/r/in/g': 36,
'in/qu/i/r/i/n/g': 36,
'in/q/u/i/r/in/g': 46,
'in/q/u/i/r/i/n/g': 46,
'i/n/qu/i/r/in/g': 36,
'i/n/qu/i/r/i/n/g': 36,
'i/n/q/u/i/r/in/g': 46,
'i/n/q/u/i/r/i/n/g': 46
As the game progresses you start each round with an increasing number of cards in your hand. The last round has 10 cards.
The implementation takes the hand cards and deck card and suggests the best play as a result.
Hand: a/cl/g/in/th/m/p/o/u/y
Deck: n
Score: 58
Complete: True
Words: ['cl/o/th', 'm/u/n/g', 'p/in/y']
Pick up: n
Drop: a
Inference Service
AzureML has a few different ways that you can
deploy a model for inference.
This notebook shows the flow and interaction with a local, ACI (Azure Container Instance) and AKS (Azure Kubernetes Service) deployed AzureML service.
The pattern is very similar to what we did for training: define an environment, write a scoring script, deploy.
The dependencies for the environment are similar to those used for training but we can use icevision[inference] instead of icevision[all] to reduce the size a bit. Plus we need to add pygtrie for the prefix tree code. I did hit on a problem here though that might help people out. I wanted to use a CPU Ubuntu 18.04 base image but for some reason it threw errors about a missing library. Thankfully the AzureML SDK allows you to specify an inline dockerfile so we can add the missing library:
Note that we're defining the scoring script,
score.py, in the
InferenceConfig. This contains two functions which you need to define:
init() and run(). In the
init() function you load the model and any other initialization, then
run() is called every time a request comes in through the web server.
To
consume the service you just need to know the service_uri and optionally the access key. You can get these from the portal or by calling
get_keys() and grabbing the
service_uri property from the service object returned when you call
Model.deploy(). The gist below shows deploying to AKS and getting those properties:
Note I'm referring here to an inference cluster named jb-inf which I previously set up through the portal.
Finally we can call the web service and get the results. The scoring script takes a json payload with base64 encoded images for the hand and the deck and a hint for the number of cards in the hand:
Serverless
The inference service through AKS is great for serious usage but it's not a cost effective way to host a hobby service. Your AKS cluster can scale down pretty low but it can't go to zero. Therefore you'd be paying for 24x7 uptime even if no one visits the site for months! This is where serverless can really shine. Azure Function Apps on the
Consumption Plan can scale to zero and you only pay for the time when your functions are running. On top of this there's a significant level of
free tier usage per month before you would have to start paying anyway. I haven't paid a cent yet!
"Apps may scale to zero when idle, meaning some requests may have additional latency at startup. The consumption plan does have some optimizations to help decrease cold start time, including pulling from pre-warmed placeholder functions that already have the function host and language processes running."
Here's some data taken from running a few invocations in a row on the card detection function which I'll go through next:
As you can see, there's a slow invocation taking 50 seconds, then all subsequent ones take 10.
Function App
Azure Function Apps are essentially hosts that contain multiple functions. This is a little different if you are used to AWS Lambda functions. As you can imagine there are many different ways to develop, test and deploy Azure Functions but I have found using the Azure Functions extension for VSCode is really nice. There are great
getting started guides that I won't repeat here.
When you're working with Azure functions you define settings for the host in the
host.json and for python you have a single
requirements.txt file to define the dependencies for the host. I decided to divide the problem of finding the best play for a set of cards into two functions. One,
cards, that does the object detection on the hand and deck and a second,
game, that takes two strings for the hand and deck and returns the best play. This basically splits what we had earlier from the single scoring script in the AzureML AKS deployment. Here's what the directory tree looks like:
├── cards
│ ├── function.json
│ ├── __init__.py
│ └── quiddler.pt
├── game
│ ├── function.json
│ ├── __init__.py
│ ├── quiddler_game.py
│ └── sowpods.txt
├── host.json
├── local.settings.json
└── requirements.txt
You can see the layout with the two functions and the host. Note, in the cards folder there's quiddler.pt - the trained model, and in the game folder there's sowpods.txt - the word dictionary. These are both heavyweight items for which there is some overhead to initially load and process. In both cases we use a global from the entry-point function: main() to lazy initialize, just once. Subsequent calls to this running instance will not need to perform this initialization:
The game function is quite straightforward. Let's look at the cards function. There are a couple of changes from the AKS implementation mostly to support the web app front-end that we'll get to later. Support has been added for URLs - if you pass in a URL instead of base64 encoded image it will fetch it. We're also now returning the images with the predict mark-up to display in the UI. This borrowed a bit of code from the training run when we uploaded test result images to the workspace:
A final note on the requirements.txt - to save some load time we want to keep the dependencies fairly tight. So CPU pytorch libraries are loaded and icevision with no additional options:
After deploying to Azure you can see the functions in the portal and in VSCode:
If you right-click on the function name you can select "Copy Function Url" to get the api end-point. In my case for the cards it's:
https://quiddler.azurewebsites.net/api/cardsNow we can post a json payload to this URL and get a result, great! So let's make a front-end to do just that:
First things first, let's take a look at the vue.js web app. Front-end design is not my strength, so let's just focus on how we call the serverless functions and display the results. In main.js this is handled with uploadImages(). This builds the json payload and uses axios to send it to the URL of the function we discovered earlier. If this call is successful the marked-up card images are displayed and the strings representing the detected cards are sent to the game serverless function. If this second call is successful, the results are displayed.
A really useful feature of all the Azure services used in this blog post is that they can all be developed and tested locally before you deploy. You saw how the training and inference in AzureML can all be done locally. Function Apps can run up in a local environment and you can debug right in VSCode. One complication with this is CORS. When developing locally you need to define the CORS setting for the function app in local.settings.json:
With this in place you can just open the index.html page as a file in Chrome and temporarily set the api URLs to the local endpoint. e.g. http://localhost:7071/api/
The new Static Web App features Github Action based deployment. So, once you're all set with the local development you can use the VSCode extension and provide access to the repo containing your app. It will then install an Action and deploy to Azure. Now, whenever you push to main it will deploy to production! There are also staging environments for PRs, free DevOps! You can even see the action history in VSCode:
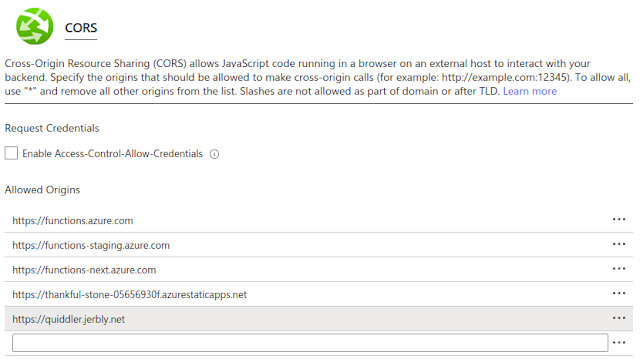
. Finally, we have to set CORS in production through the portal:


